|
|
|
- Below -
Date:
2006
Client:
Intrawest-Central Reservations
Framing & Finishing Carpenters:
Michael Ravenscroft & Employees
Project description: |Commercial |Create new offices in existing space to match other offices. Location: Near the Automall on the North Shore in North Vancouver B.C. |
 |
 |
 |
 |
|
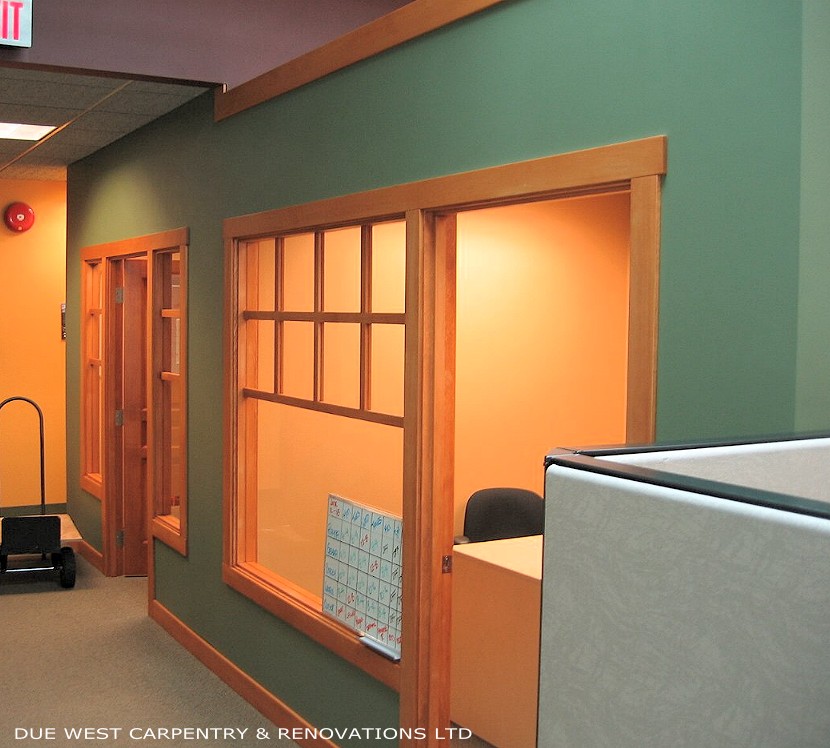
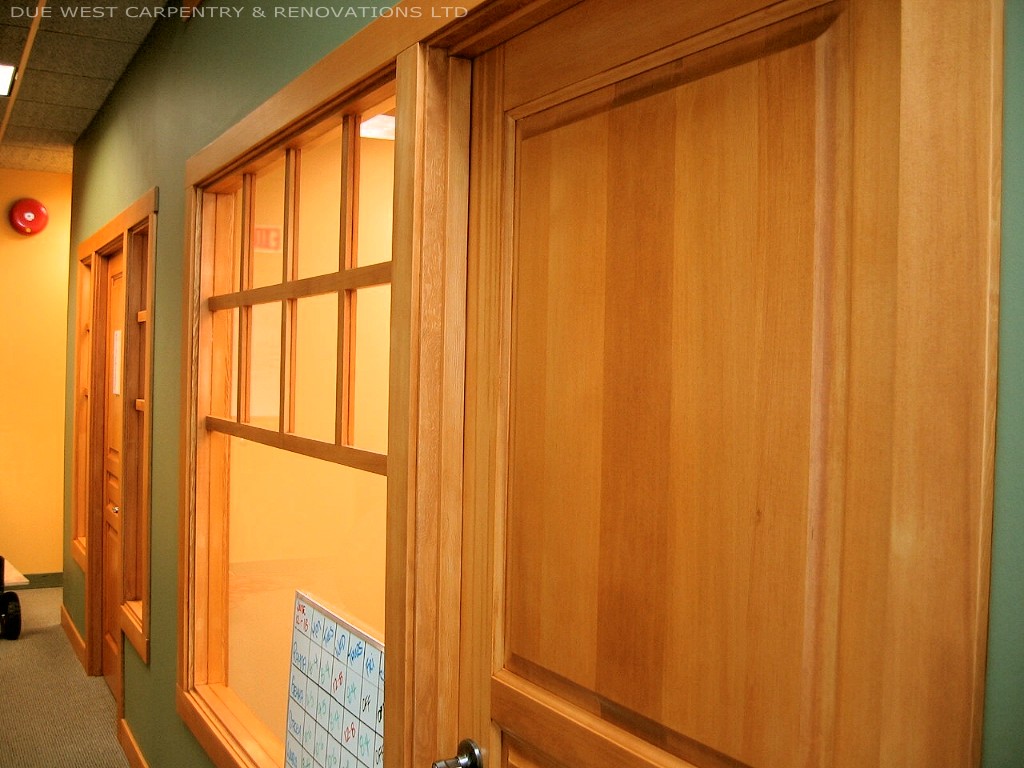
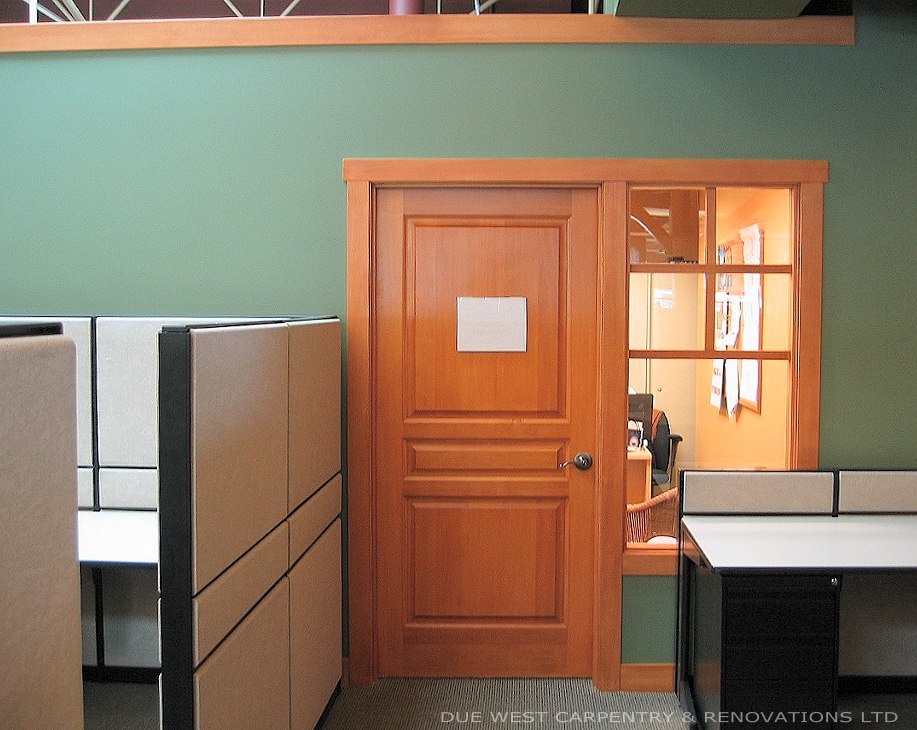
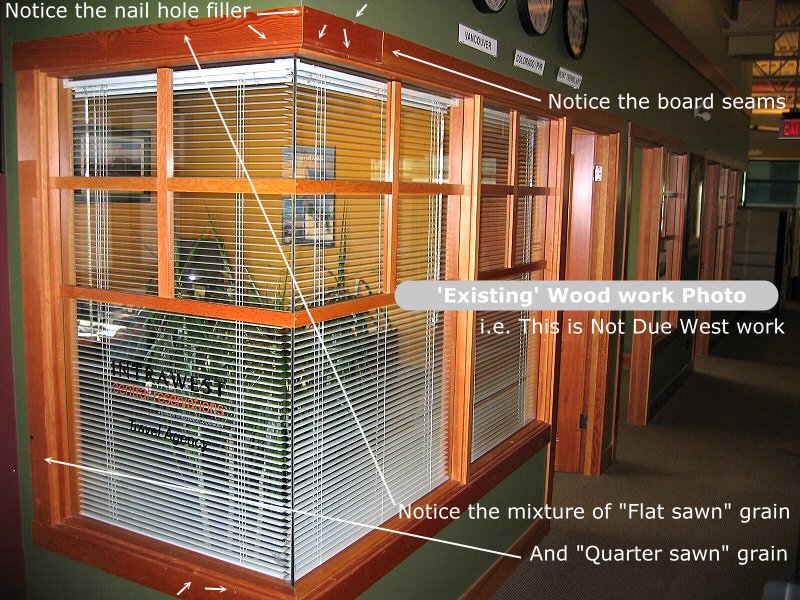
The Details: The 'exisiting' offices were comprised of wood that had been coated with a clear finish. During this time a natural darkening of the wood had occured from UV light. In order for the new wood not to appear much lighter than the existing wood, I elected to have the wood 'tinted' or 'stained' to match the natural occurance of the exisiting woodwork. We then applied a high quality ultra violet clearcoat protection that I knew would Keep the new wood consistent in color with the existing. Points of Interest : The work was performed after hours and during business hours depending on which trade was working in order to accomodate the the nature of the business we were working in and the required sound levels for them to function properly. You can see from this photo (Picture) that the existing wood work in the other offices was not as nice as Due West Carpentry's Work where the variance would mostly be comprised of wood selection, installation and finishing techniques. |
|
|
- Below -
Date: 2010
Client: Julie
All Carpentry & Installations:
Michael Ravenscroft
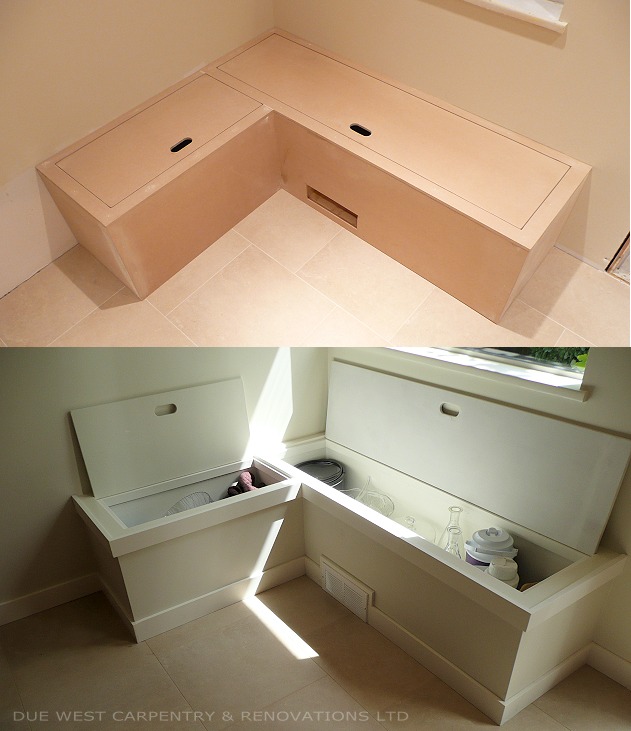
Project description: Remodel Entire Kitchen with New Inside/Outside Doors & Custom Built breakfast Storage Bench. Location: In North Vancouver on the North Shore of Vancouver B.C. |
 |
 |
 |
 |
|
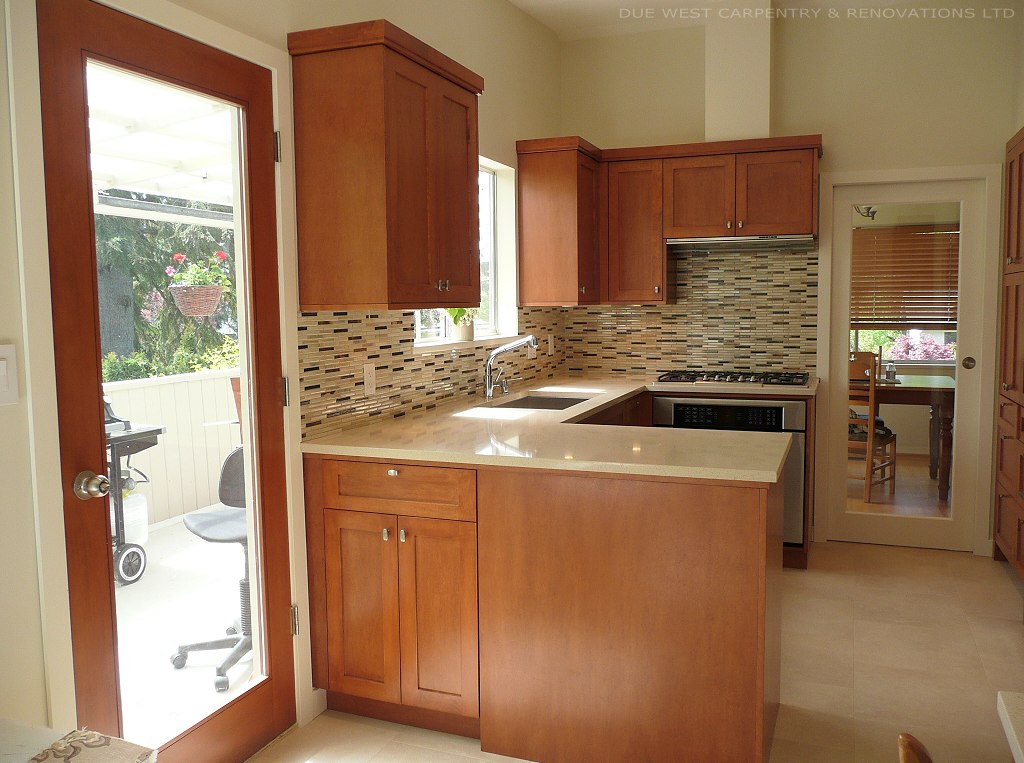
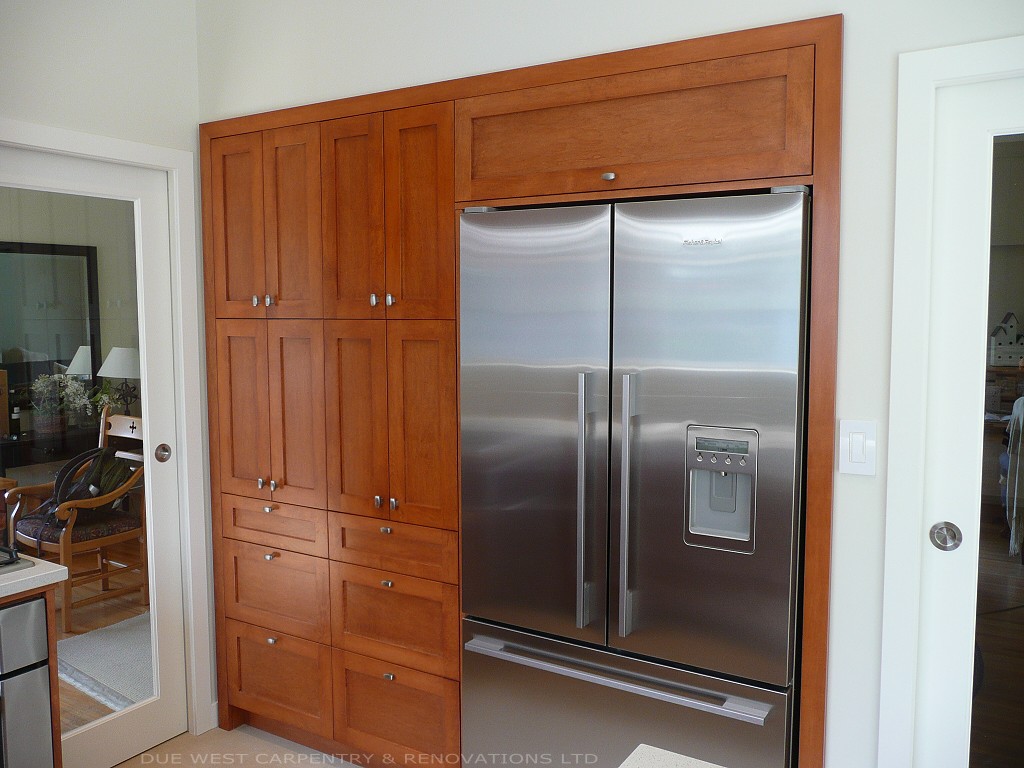
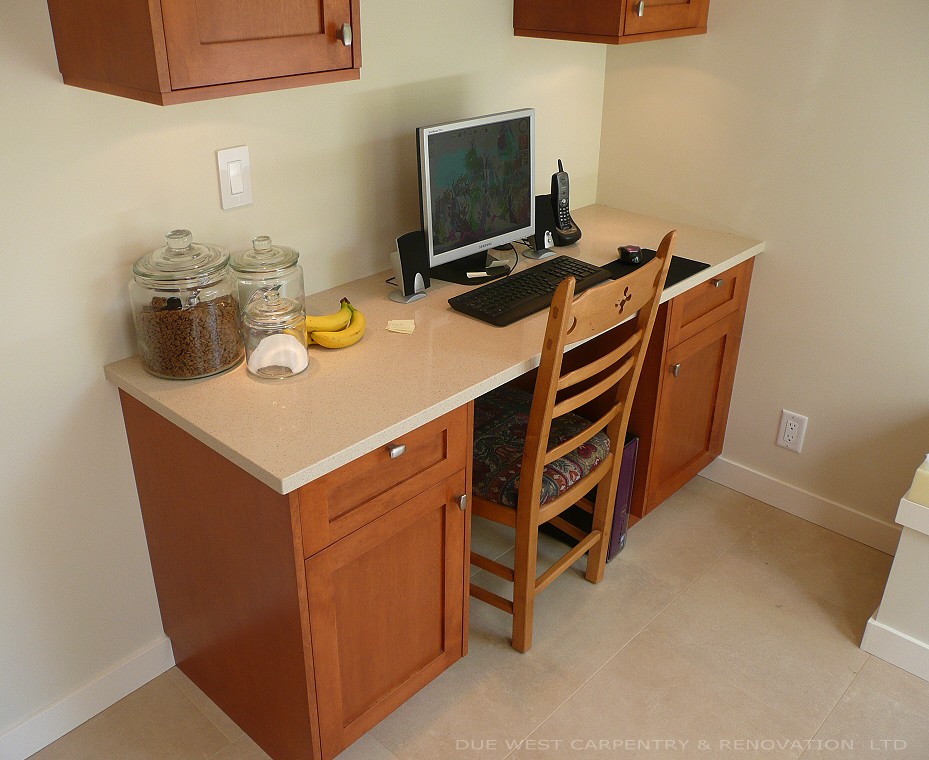
The Details: While convincing the customer that the exsiting cabinets above the peninsula counter needed to be left out of the new design, but very well knowing that the lost space needed to be redirected in the form of a super pantry somehow, the customers proposition of built in breakfast nook seating came up along with her idea for seasonal storage needs under the seats which left no doubt in what direction we were taking and thus I started building. (Julie's choice of cushion fabric hadn't been chosen at time of the pictures been taken) Design elements: After moderating the clients desired 'Layout' of the new kitchen, I designed the build plans for the cabinets and continued with the Installation. I also designed a cabinet crown moulding at the request and taste of the client who wanted something less ornate than your typical off the shelf colonial maple crown moulding. You may notice the 'Horizontal' wood moulding that sits between the countertop and the lower cabinets which ties in nicely with the similar valance moulding of the upper cabinets. Points of Interest : The 'white glove' install of a new side entry door was pre-stained to match the kitchen cabinets for a profound and collective appearance with the addition of a matching desk and book shelves. The new glass pocket doors also match well in shape with the side door onto the deck and function well for light translucency, sound & cooking smell containment and also create an airyness to a otherwise smaller kitchen. How the gas line was 'brough in' for a zero clearance 'built in' oven with mounting provisions located in the wall cavity where the pocket door slides into, is another story all together. |
|
|
- Below -
Date:
2005
Client:
accessaudiovideo.ca
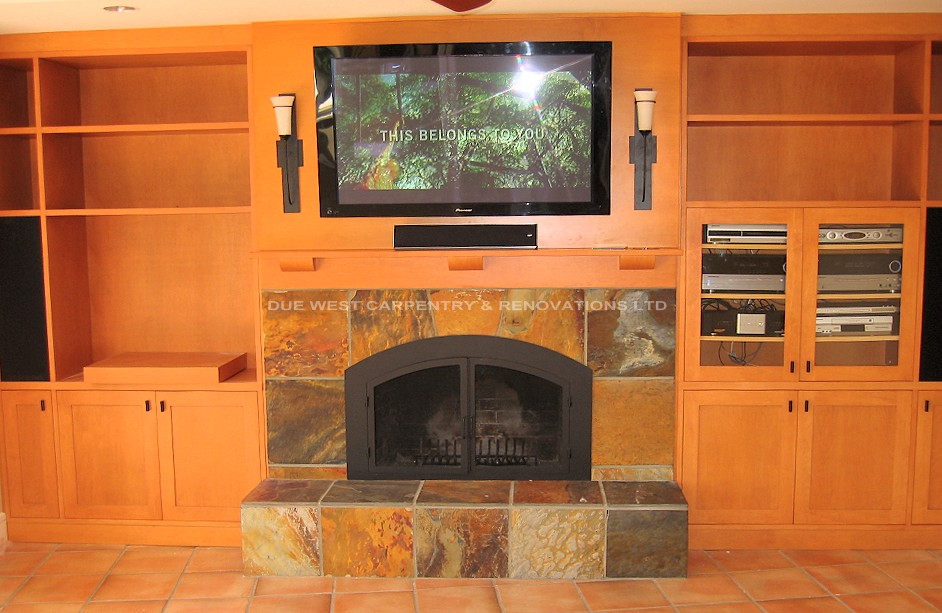
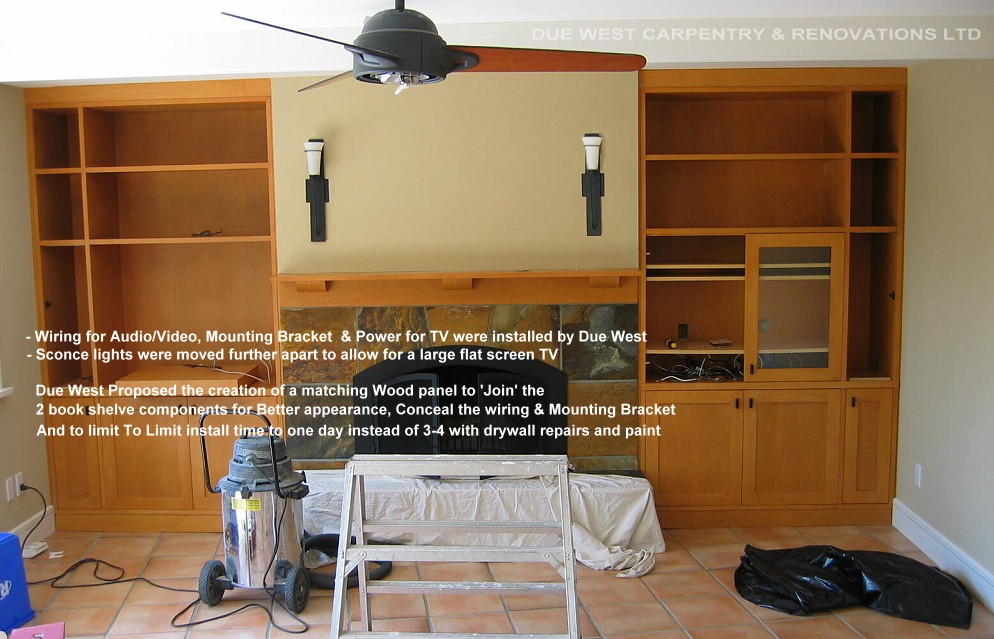
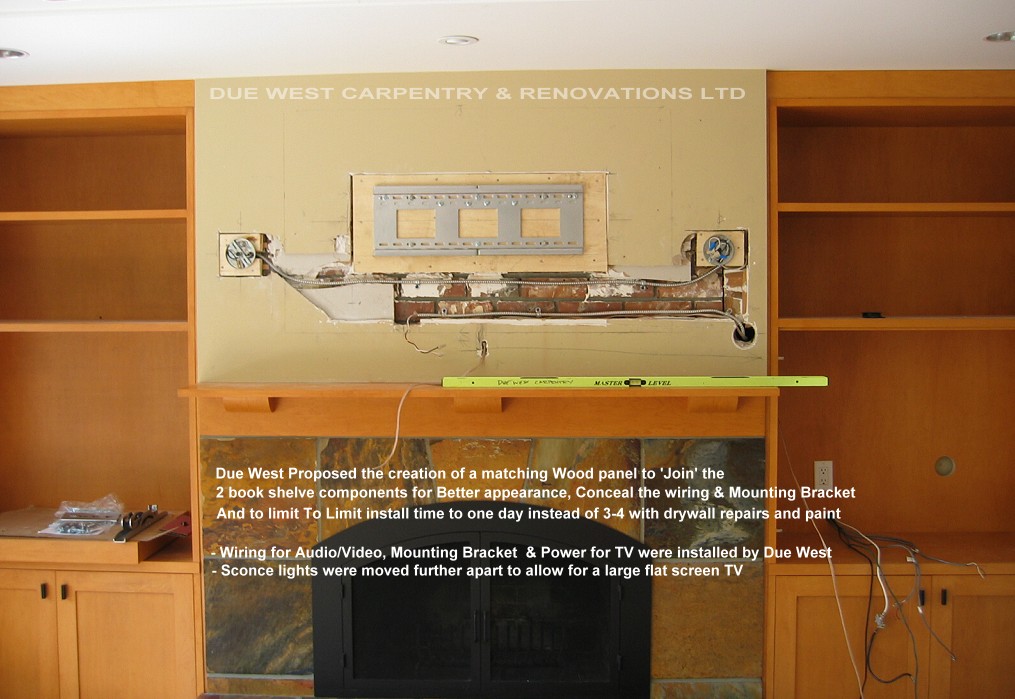
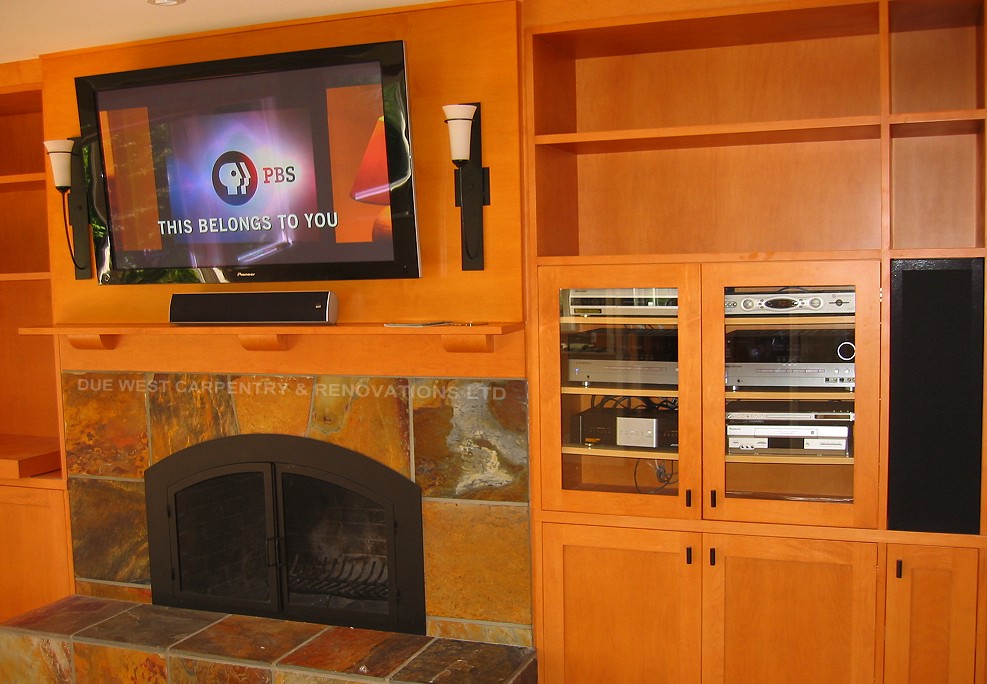
Project description: Modify Entertainment wall unit. Mount flat screen TV & Install Wiring. Carpentery: Michael Ravenscroft Location: In West Vancouver on the North Shore of Vancouver B.C. |
 |
 |
 |
 |
|
Design elements: Due West was procured to Install a 50" flat screen TV with a hidden power plug in the location over the fireplace and install the audio wiring from the TV to the components cabinet on the right. Due West Proposed the creation of a matching wood panel to 'Join' the 2 bookshelves on either side providing a more visually appealing 'completed' custom looking wall unit with wood contrast for the Sconce lights, Black TV and the slate fireplace surround. This multi purpose idea also concealed the wire channels, mounting bracket and allowed for a one day install insead of building the wall out for wire paths and re-drywalling and painting which would have involved 3-4 site visits. Points of Interest : The Sconce lights had to be remounted further apart to allow for the TV width. You can see the original brick fireplace behind the drywall and the logistical challenges it presented. The Details: Please note how accurately the maple panel was color matched to the exisiting bookshelves and mantel. |
|
- Below -
Date: 2008
Client: Roth
Remodelling Carpenter:
Michael Ravenscroft
Project description: Remodel stairwell Banisters, Install hallway & living room recessed lighting. Install new Hallway Doors & Paint. Location: In North Vancouver on the North Shore of Vancouver B.C. |
 |
 |
 |
 |
|
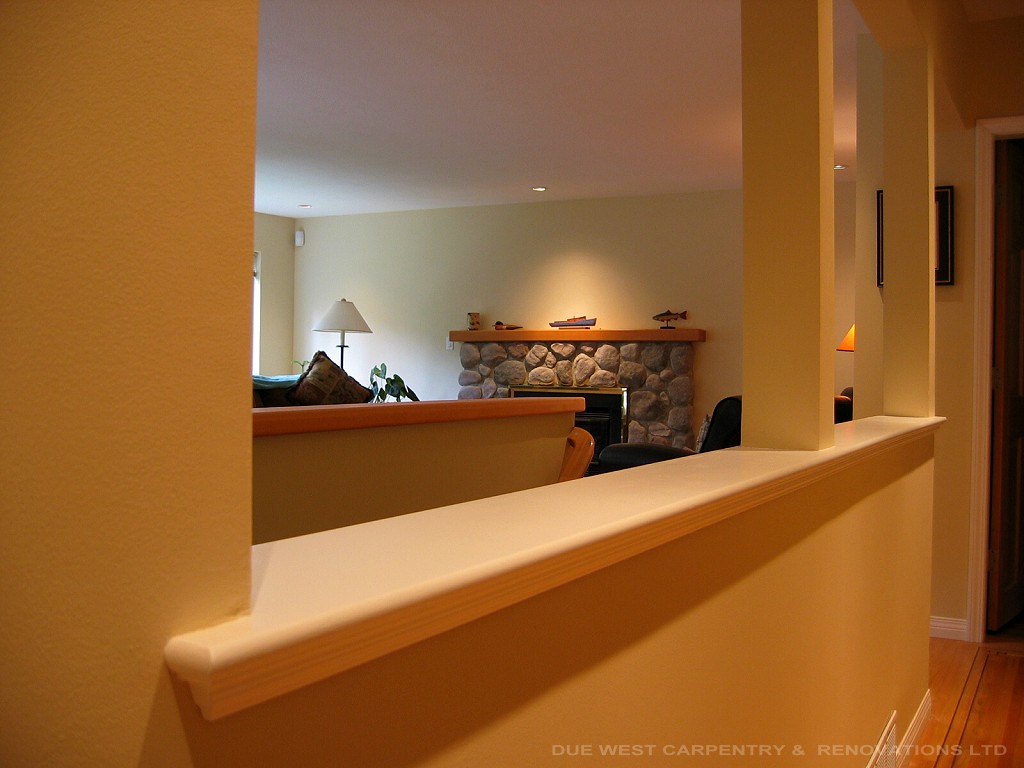
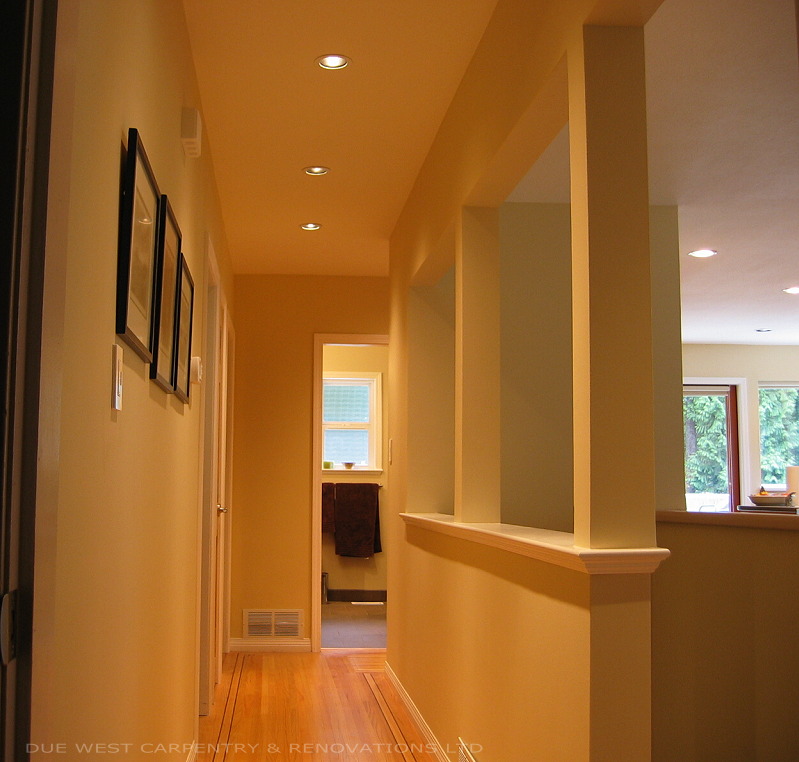
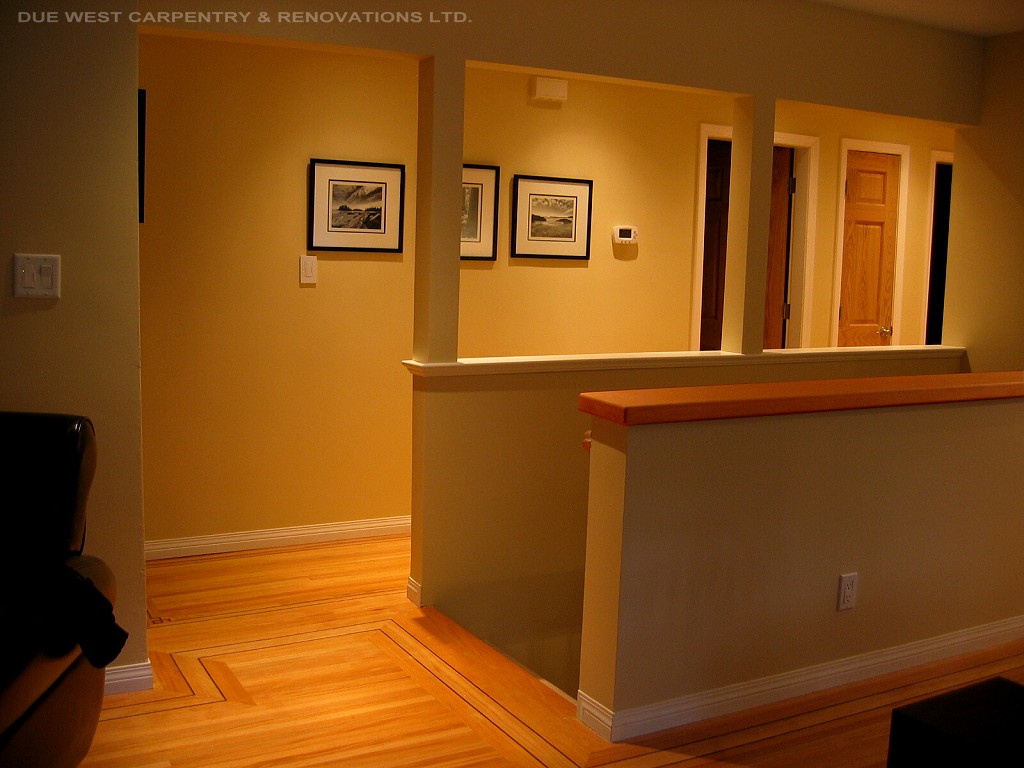
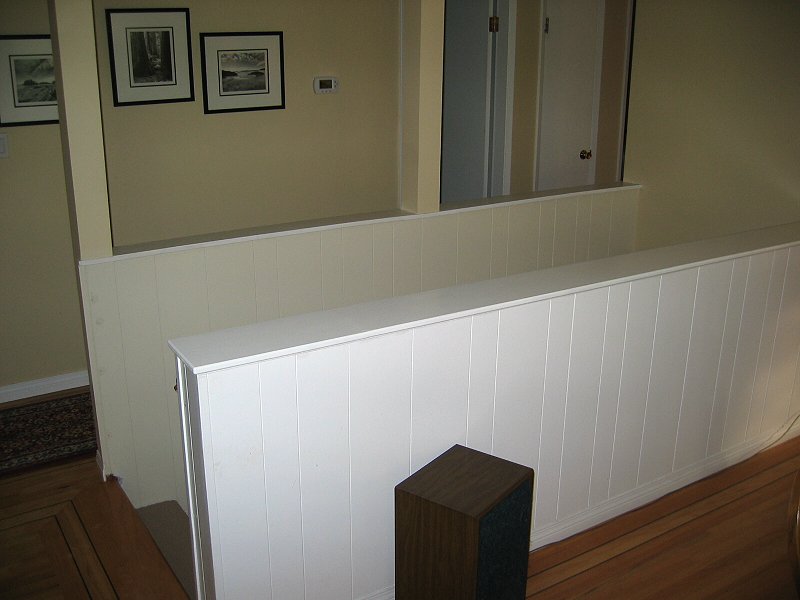
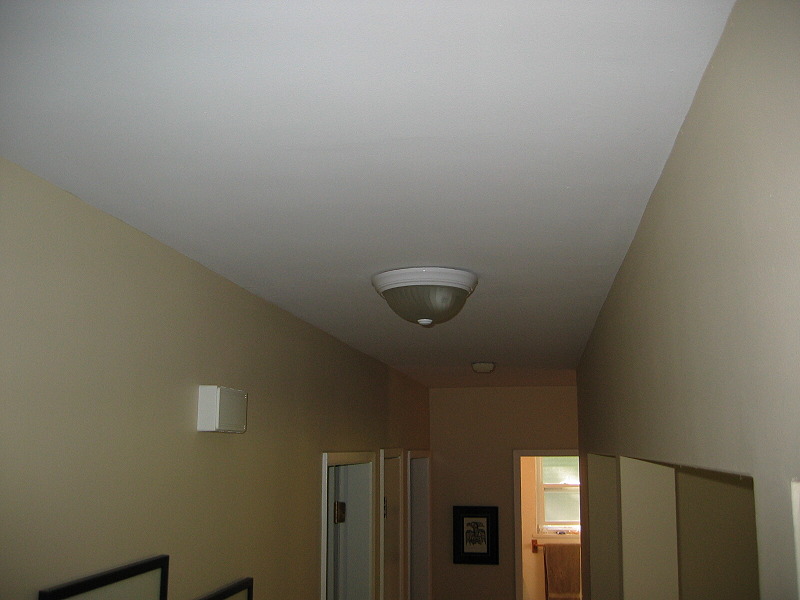
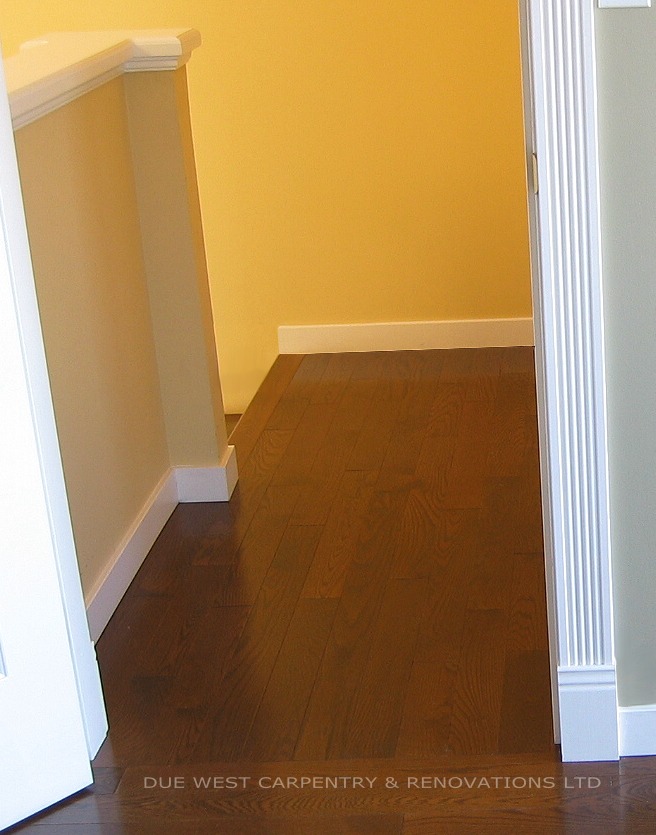
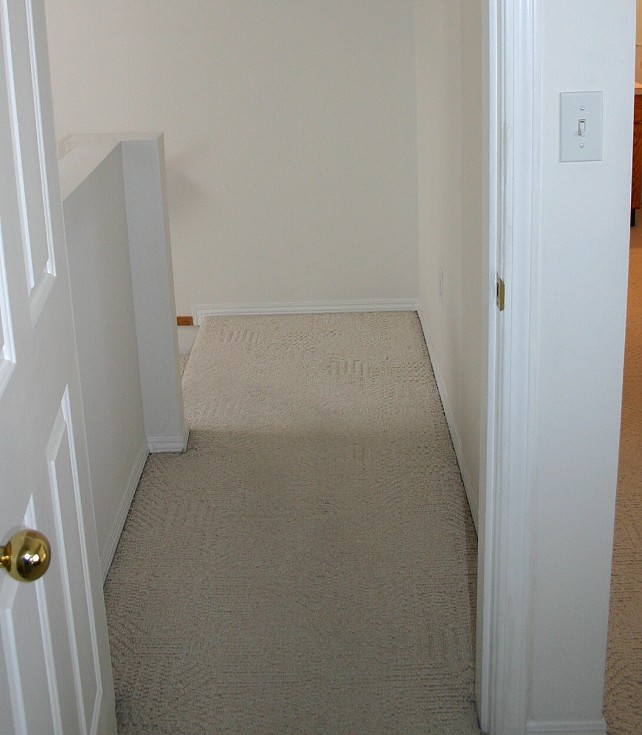
Points of Interest: The orignal banisters were not of equal widths. The banister closest in the picture showing the painted wood paneling happened to be 3-4 inches wider than the other one. Reducing the original width to match the other one would result in having to add matching strip flooring which would offset the walnut inlay and require matching the right thickness, grain, species of fir, and also blending the age of tint from the old flooring to the new. It would also create a 'Jog' in the wall were the banister wall meets the full height wall. As the client was waning away from this avenue I then proposed to make a maple bansiter cap of equal thickness and similiarity to the fireplace mantel which was also recieved as purposeful since the bansiter had served as a drink holder during previous social events. (Please note at the time of the picture that the clear coat had not been applied yet) The Details: Notice that the painted banister cap seamlessly appears to be under the support posts. Even though i didn't take any direct photos you may notice in one picture that we replaced & fitted the existing door slabs with new oak doors. Design elements: You can see the positive effects of strategically placed lighting in the hallway and the living room, and how it can be used to accent certain features and create a pleasant ambience. |
|
|
- Below -
Date: 2003 & 2005
Client: Paul & Lorraine
Project description: (1) 2003. Remodel Town house in North Vancouver (2) 2005. Remodel Holiday Lake House in Penticton |
 |
 |
 |
 |
 |
|
The Details: I was never a big fan of oak flooring but with the modernization and availability of multiple color choices the pronounced grain now seems to blend in and yet still present an attractive and unique appearance. Of course maple is available in just about any color that a designer might dream of, if a subdued and more uniformed appearance is required. With Pre-finished Floors and Like anything in life however, not all 'stained' floors are the same, nor are they priced as so. Even though staining creates a uniformity and hides a lower grade of wood it is imperative that any Non natural wood be it flooring or cabinets that has color added, is done so in the form of pre-staining (with more than one coat) Prior to the protective UV inhibiting urethane coats. It has become quite common for offshore hardwood floor and cabinet products including most furniture to have the 'stain' or color added to the urethane thus eliminating a few key processes. For one, the results don't show the natural beauty of the wood as the process represents more of a paint job, but Most importantly when they (not if) get scratched, nicked, or chipped, that bare, lighter colored, non pre-stained wood shows with great highlight and great disappointment. Because the urethane coat is pigment heavy the initial coats do not soak or bind into the wood properly which causes the wood to chip and scratch a lot easier and more frequently. |
|
|
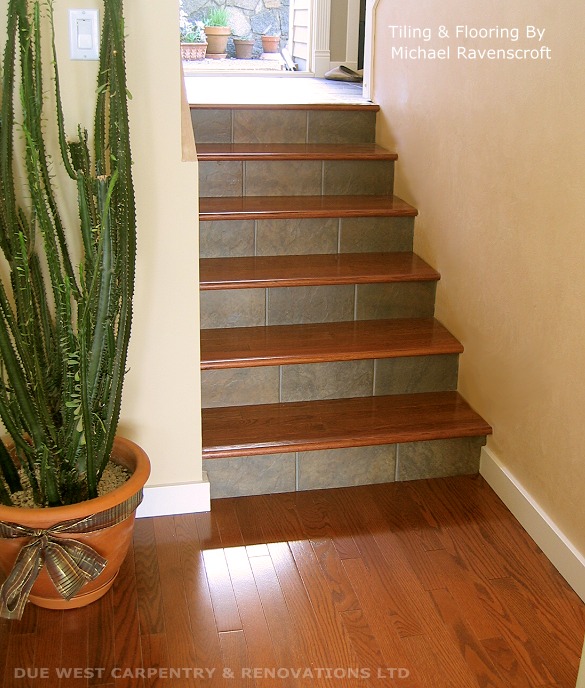
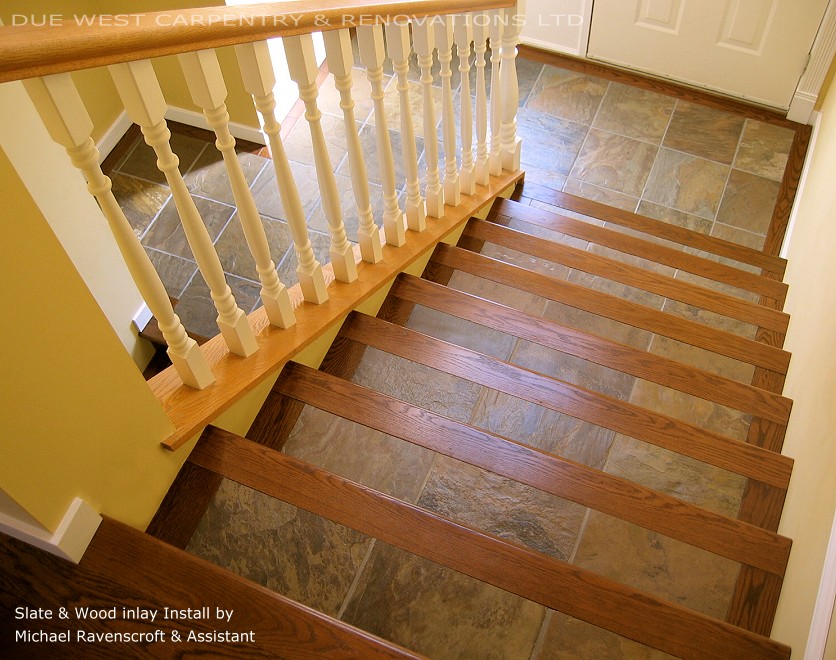
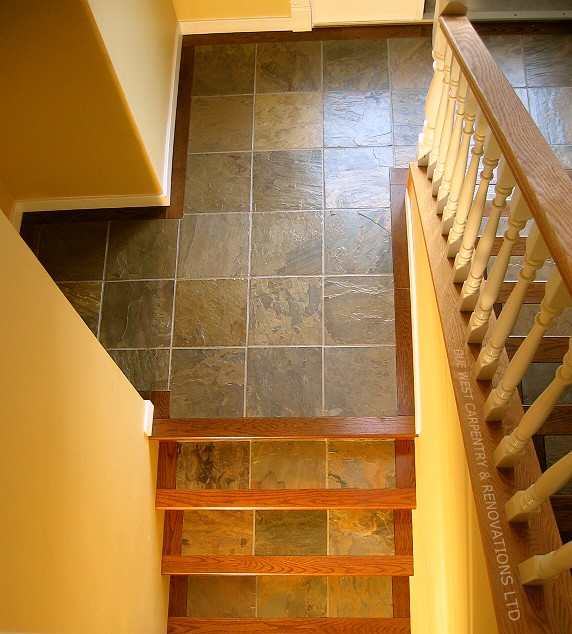
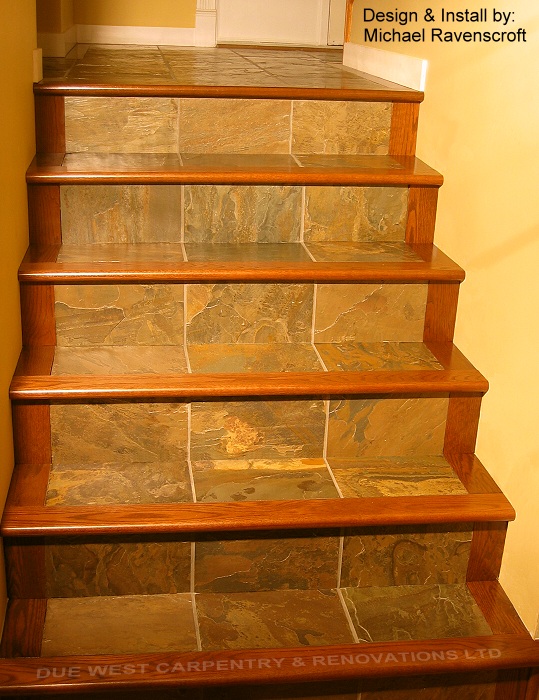
Design elements: I have always been a big fan of presenting wood and stone together in some fashion or another, or in this case natural looking Porcelaine tile and hardwood stair flooring. I have found that it creates a 'Natural' coupling which may be attested to the Texture, Color variations and a resemblance to nature. Points of Interest: The before and after pictures of the living room tells the story of 14ft high ceilings (Yes 14ft high) and the necessity for a proportionately large crown moulding and certain preperation techniques to keep mouldings that big in place, and from the mouldings pulling apart on corners and joins from annual building movement. |
|
|
|
 |
 |
 |
 |
 |
|
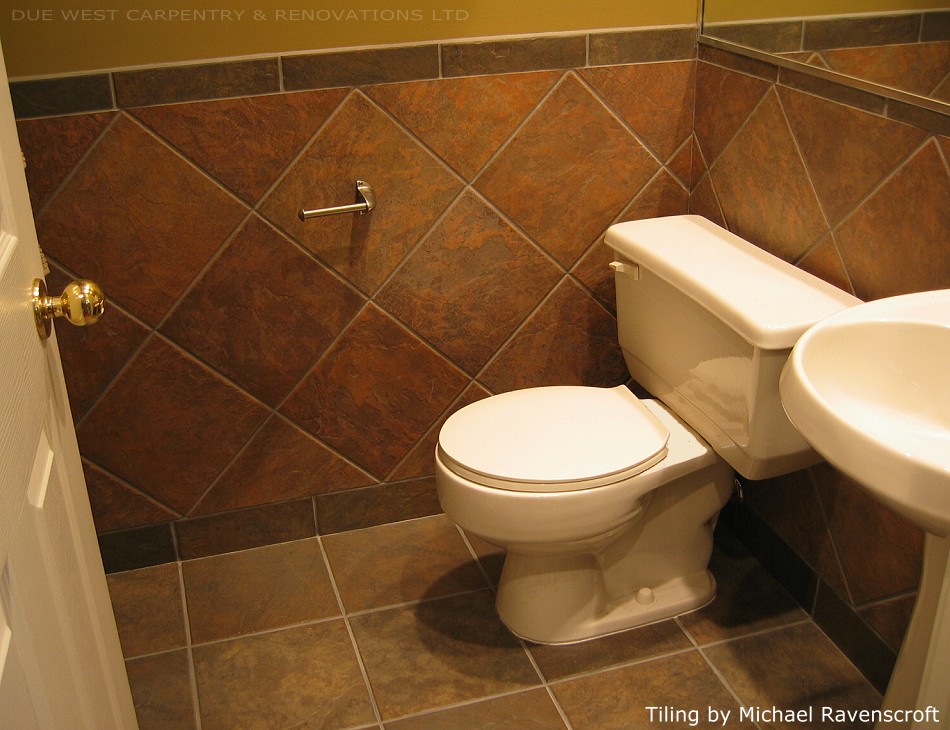
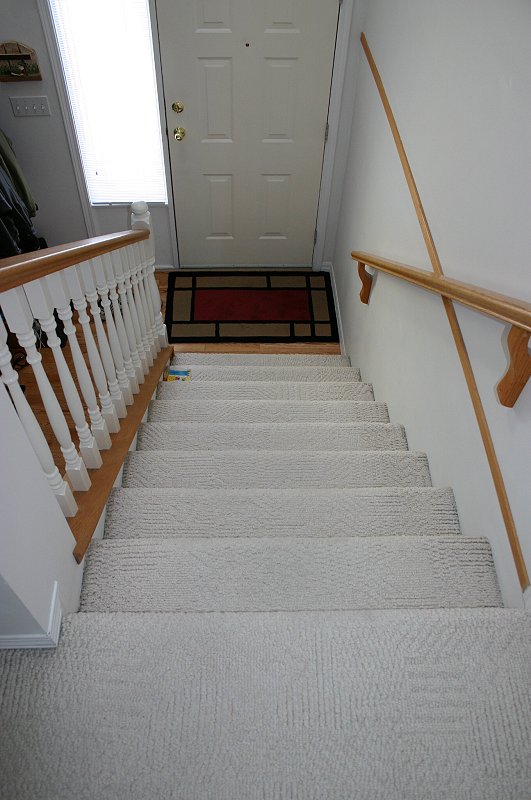
The Details: The use of semi-guage slate has always required a higher level of skill and patience when installing, since the term semi-guaged refers to the industry allowable standard of 1/4" variance from one piece to the next. Considering that the majority of semi-guaged slate is roughly 1/4" thick in the first place, a heavy 'bed' of mortar is required in order to level each piece to the next on all 4 sides and in this case, against a wood border. Fully guaged slate on the other hand is usually polished and represents marble or granite in appearance and price. Design elements: Which came first? The Hardwood inlay or the Slate? In no way can the prefinished sierra stained oak be damaged from the slinging of slate and mortar when installing in such delicate areas, but equally important is the requirement of the slate to be 'Level' with the wood inlay and bullnosing, as no one wants to stub thier toes or snag there socks or have a crappy looking floor and staircase born from the idea of the Contractor. Points of Interest: The hallway banister pony wall depicted in the before and after pictures went from a 'marring' drywall top surface to me pulling out my router and doing a little bit of 'Joinery' to create a more finished look. Note: Even though my 'Crew' was represented by 4 other employees, and at that time the majority of my leg was in a cast from being broken in multiple places, their was plenty of work to do keeping this remodeling project on schedule with all new hardwood floors, baseboard, door casing, bathroom tiling and the painting of the house which made great winter work. |
|
|
|
|
|

|